This Peer Leader tip comes from Dr. Kellie Scott, a Family Physician in St. Thomas.
Not only does a patient photo in the chart reduce medical error,1, 2 it can improve patient interactions for you, your patients, and your practice staff too.
I first recognized the value of patient photos in the long-term care setting. In one home I worked in, they used photos of the residents not only in the chart to ensure accurate medication administration, but they also used photos of the residents when they were younger to display outside each person's room. This would help some with memory impairment find their way to their rooms. I found it also helped staff remember that the older person they were about to interact with was once younger and healthier and had a full life prior to being dependent on the care of others in the long-term care facility.
Photos help ensure you have the right chart open to avoid documentation in George Senior's chart when you're actually talking to George Junior. Your staff can also avoid embarrassment we've all experienced by phoning and asking to speak to George Junior, who is actually a 2-year-old! For an in-person visit, staff can more easily identify the patient in the waiting room, facilitating connection. With many of our visits currently being over the telephone, the visual cue and reminder of what the patient looks is also beneficial. Staff may not have met the patient before, and having a photo in the chart as a reference humanizes the interaction for staff.
For a locum or a new physician just getting to know their patients, a physician covering their colleague who is on vacation, or a specialist reviewing lab work on a patient they've only met once, the photo can jog your memory and put the clinical information you are reviewing into context.
A photo can also help in your clinical assessment, for example, has the patient gained or lost a significant amount of weight? Do they look unwell compared to their usual appearance? Might they look a little jaundiced today or is that normal for them? Is there a bit of proptosis that is new, or some loss of the lateral eyebrow hair? Is that facial droop new?
Adding a photo to the chart is easy. First, you need to capture the image. There are several ways to do this:
Your reception staff can be equipped with a simple digital camera with a USB cable or SD card to transfer the files to the computer.
I use TELUS PS Suite as my EMR so my staff or I can use the TELUS EMR Mobile App to take a photo, which gets saved directly into the chart (but you'll still have to save it to the desktop to get it to the right spot in the chart in the next step).
You can take a screen shot during a virtual visit (ask the patient for permission before you do it, so you don't surprise them with camera shutter sound!) Use CMD-SHIFT-4 on a Mac or CTRL-ALT-F10 on a PC to take a screen shot.
Another option is to get the patient to email you a photo of themselves, which you would handle like any other email attachment.
Once you have the photo, the next step is to get it into the chart.
In TELUS PS Suite EMR3, simply drag the photo from the desktop or folder where it is saved and drop it on the demographics bar inside the records window. For instructions on how to do this using Accuro®4 and OSCAR EMR5, please see the links below.
This Peer Leader tip comes from Dr. Kellie Scott, a Family Physician in St. Thomas.
Not only does a patient photo in the chart reduce medical error,1, 2 it can improve patient interactions for you, your patients, and your practice staff too.
I first recognized the value of patient photos in the long-term care setting. In one home I worked in, they used photos of the residents not only in the chart to ensure accurate medication administration, but they also used photos of the residents when they were younger to display outside each person's room. This would help some with memory impairment find their way to their rooms. I found it also helped staff remember that the older person they were about to interact with was once younger and healthier and had a full life prior to being dependent on the care of others in the long-term care facility.
Photos help ensure you have the right chart open to avoid documentation in George Senior's chart when you're actually talking to George Junior. Your staff can also avoid embarrassment we've all experienced by phoning and asking to speak to George Junior, who is actually a 2-year-old! For an in-person visit, staff can more easily identify the patient in the waiting room, facilitating connection. With many of our visits currently being over the telephone, the visual cue and reminder of what the patient looks is also beneficial. Staff may not have met the patient before, and having a photo in the chart as a reference humanizes the interaction for staff.
For a locum or a new physician just getting to know their patients, a physician covering their colleague who is on vacation, or a specialist reviewing lab work on a patient they've only met once, the photo can jog your memory and put the clinical information you are reviewing into context.
A photo can also help in your clinical assessment, for example, has the patient gained or lost a significant amount of weight? Do they look unwell compared to their usual appearance? Might they look a little jaundiced today or is that normal for them? Is there a bit of proptosis that is new, or some loss of the lateral eyebrow hair? Is that facial droop new?
Adding a photo to the chart is easy. First, you need to capture the image. There are several ways to do this:
- Your reception staff can be equipped with a simple digital camera with a USB cable or SD card to transfer the files to the computer.
- I use TELUS PS Suite as my EMR so my staff or I can use the TELUS EMR Mobile App to take a photo, which gets saved directly into the chart (but you'll still have to save it to the desktop to get it to the right spot in the chart in the next step).
- You can take a screen shot during a virtual visit (ask the patient for permission before you do it, so you don't surprise them with camera shutter sound!) Use CMD-SHIFT-4 on a Mac or CTRL-ALT-F10 on a PC to take a screen shot.
- Another option is to get the patient to email you a photo of themselves, which you would handle like any other email attachment.
Once you have the photo, the next step is to get it into the chart.
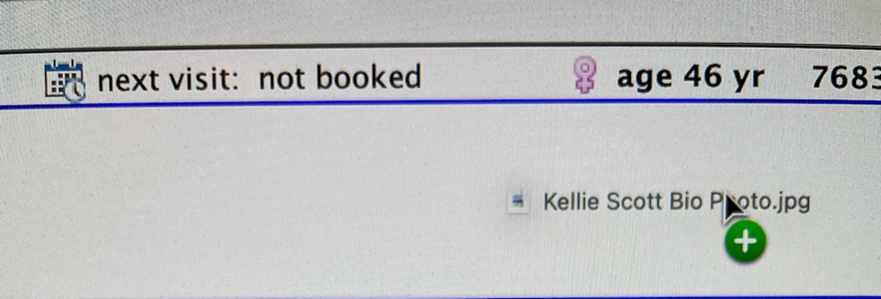
In TELUS PS Suite EMR3, simply drag the photo from the desktop or folder where it is saved and drop it on the demographics bar inside the records window. For instructions on how to do this using Accuro®4 and OSCAR EMR5, please see the links below.
Demographics Bar without photo:
You'll be prompted to save a new portrait:
To update or change the photo, just drop a new photo over the old one and it will be replaced (if you want to save the old photo, you'll need to save it first and drop it into a note as a paperclip for future reference).